Quick No-Bake Tiramisu: Indulge in This Elegant Italian Classic
Imagine a dessert that whispers elegance, sings with rich coffee and creamy sweetness, yet requires no oven and minimal effort. Enter the enchanting world of no-bake tiramisu, a culinary masterpiece that delivers all the sophisticated charm of its classic counterpart without the fuss. This isn't just a dessert; it's an experience, a moment of pure Italian bliss you can create right in your own kitchen, perfect for busy hosts and dessert lovers alike.
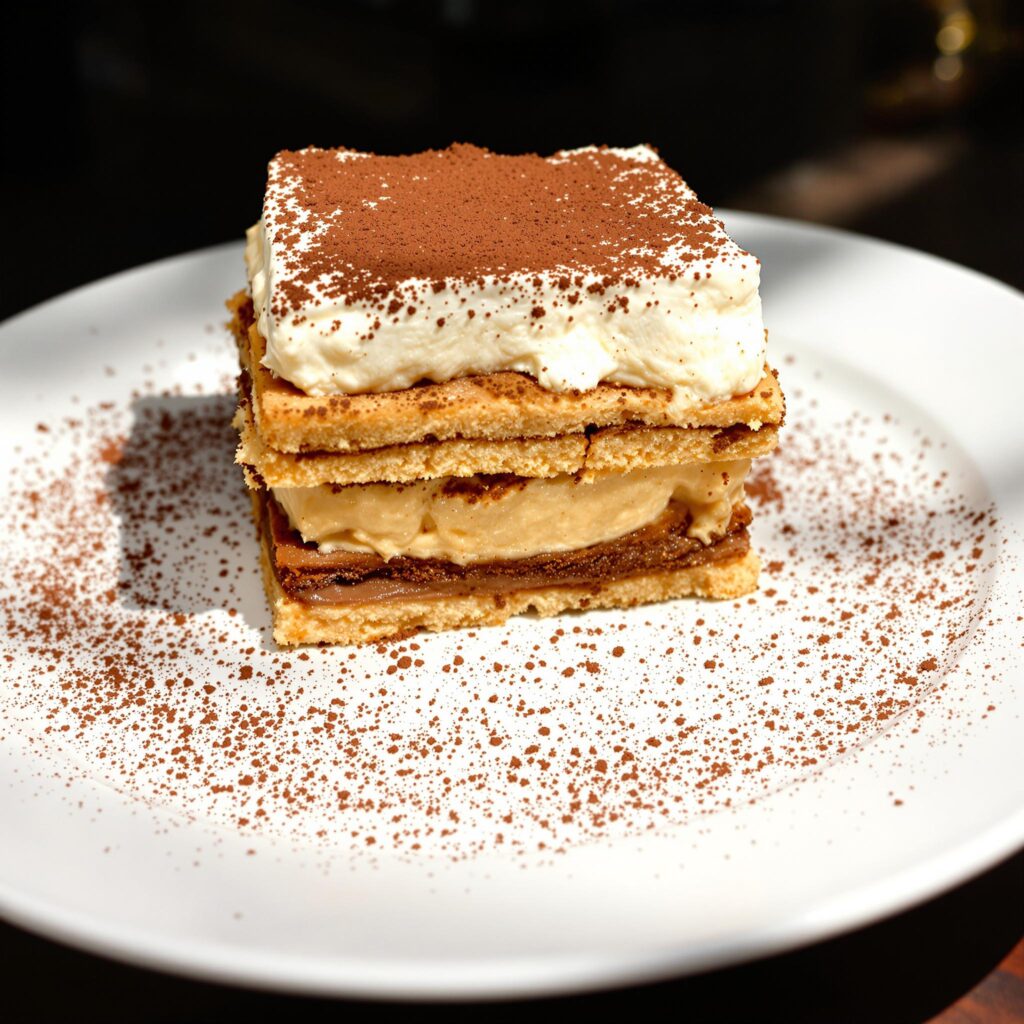
Tiramisu, meaning "cheer me up" or "pull me up" in Italian, lives up to its name with every delightful bite. It’s a symphony of textures and tastes: delicate ladyfingers quickly dipped in robust coffee, enveloped by a cloud-like mascarpone cream, and dusted with a hint of cocoa. Our Master Easy No-Bake Tiramisu: Simple Steps to Italian Delight takes this beloved classic and streamlines the process, proving that exquisite flavor doesn't have to be complicated. Whether you're a seasoned chef or a beginner in the kitchen, this recipe promises impressive results that will have everyone asking for more.
What Makes No-Bake Tiramisu a Dessert Dream?
The allure of a no-bake tiramisu extends far beyond its exquisite taste. Its simplicity is truly a game-changer, especially for those seeking to impress without spending hours in the kitchen. Here's why this version of the Italian classic is a true gem:
- Effortless Elegance: Forget turning on the oven! This dessert comes together with a whisk and a bowl, making it accessible for even the most novice bakers. The "no bake" aspect significantly cuts down prep time, allowing you more time to savor the moment.
- Make-Ahead Marvel: Tiramisu, by its very nature, improves with time. Preparing it in advance allows the flavors to meld and deepen, transforming from good to absolutely divine. This makes it an ideal choice for dinner parties or special occasions, as you can prepare it a day or even two ahead. The convenience of a make-ahead dessert means less stress on the day of your event, a concept beautifully explored in Crafting Classic No-Bake Tiramisu: Flavors Improve Overnight.
- Safe & Simple: Unlike some traditional tiramisu recipes that incorporate raw eggs, this easy no-bake tiramisu often skips them, using a stable, creamy mascarpone mixture instead. This not only simplifies the process but also provides peace of mind regarding food safety, making it suitable for a wider audience.
- Flavor Development: The mandatory chilling time is where the magic truly happens. As the tiramisu rests, the ladyfingers fully absorb the coffee, the mascarpone cream firms up, and all the individual components harmonize into a cohesive, rich, and utterly satisfying treat.
This dessert isn't just about satisfying a sweet tooth; it's about creating a moment of joy, a little "pick-me-up" that transports you to a cozy Italian café with every spoonful.
Gathering Your Ingredients for Tiramisu Perfection
Creating a truly delicious no-bake tiramisu starts with selecting the right ingredients. Quality truly shines through in this simple yet elegant dessert. Here's a comprehensive list for serving four people, along with some insights into why each component is vital:
- 250g Mascarpone Cheese, softened: The heart of tiramisu. Mascarpone is an Italian cream cheese, incredibly rich and creamy with a slightly sweet, buttery flavor. Ensure it's softened to avoid lumps and achieve that silky smooth texture.
- 200ml Heavy Cream, chilled: This provides the airy, light texture that balances the richness of the mascarpone. Chilling it thoroughly is crucial for successful whipping. Aim for a cream with at least 35% fat content.
- 100g Granulated Sugar: Sweetens the mascarpone cream without overpowering the other flavors. Adjust to your personal preference, but remember the coffee and cocoa add their own bitterness.
- 1 tsp Vanilla Extract: A touch of pure vanilla enhances the overall sweetness and adds a beautiful aromatic depth.
- 200ml Strong Brewed Coffee, cooled: The soul of tiramisu. Use good quality espresso or very strong brewed coffee. It must be cooled completely to prevent the ladyfingers from disintegrating. A dark roast works wonderfully here.
- 100ml Coffee Liqueur (optional): Such as Kahlúa, Tia Maria, or even a good quality rum or Marsala wine. This adds an alcoholic kick and enhances the coffee flavor. If omitting, you can increase the coffee slightly or add a splash of vanilla.
- 200g Ladyfinger Cookies (Savoiardi): These light, airy, and crisp sponge biscuits are designed to absorb liquid without becoming overly soggy. They are the structural foundation of your tiramisu. Look for traditional Italian Savoiardi for the best results.
- 30g Cocoa Powder, for dusting: Unsweetened cocoa powder provides a slightly bitter counterpoint and a beautiful finish. Don't skip this, as it's essential for the classic tiramisu look and taste.
- 50g Dark Chocolate, shaved or grated for topping: An optional but highly recommended addition for extra visual appeal and a luxurious textural contrast. Choose a high-quality dark chocolate (70% cocoa solids or higher) for a deeper flavor.
Selecting fresh, high-quality ingredients ensures that your homemade no-bake tiramisu will taste as authentic and delicious as any found in a Roman café.
The Art of Assembly: Step-by-Step No-Bake Tiramisu Creation
Creating this elegant no-bake tiramisu is a rewarding process that comes together in a few simple steps. Pay attention to the details, and you'll be on your way to creamy, coffee-infused bliss.
1. Prepare the Coffee Mixture
Begin by combining your cooled, strong brewed coffee with the coffee liqueur (if using) in a shallow dish. A wide, shallow bowl is ideal for dipping the ladyfingers. Allow the mixture to sit for a few minutes; this lets the flavors meld, especially if you're using alcohol.
2. Craft the Velvety Cream Base
Whip the Heavy Cream
In a large, chilled mixing bowl, pour the heavy cream. Using an electric mixer, beat the cream on medium-high speed until it forms soft peaks. This means the cream will hold its shape when you lift the beaters, but the peaks will gently curl over. Be careful not to over-whip, as it can quickly turn grainy.
Prepare the Mascarpone Mixture
In a separate bowl, combine the softened mascarpone cheese, granulated sugar, and vanilla extract. Beat with the electric mixer (or a whisk if the mascarpone is very soft) until the mixture is smooth, creamy, and free of any lumps. It should be light and airy.
Gently Fold Together
Now, it's time to marry the two cream components. Take about one-third of the whipped cream and gently fold it into the mascarpone mixture using a rubber spatula. This lightens the mascarpone, making it easier to incorporate the remaining whipped cream without deflating it. Then, add the rest of the whipped cream and continue to fold gently until both mixtures are fully combined and the consistency is uniform and airy. The goal is to maintain as much of that light, ethereal texture as possible.
3. Layering the Masterpiece
Choose your serving dish – a glass rectangular dish (approx. 8x8 or 9x5 inches) works beautifully for showing off the layers. If you prefer individual servings, small ramekins or glasses are perfect.
- Dip Ladyfingers: Working quickly, dip each ladyfinger into the prepared coffee mixture. It's crucial not to over-soak them; a quick dip on each side (just a second or two per side) is sufficient. They should be saturated but still hold their shape, not soggy.
- First Ladyfinger Layer: Arrange the dipped ladyfingers in a single, even layer at the bottom of your serving dish. Break them if necessary to fit snugly and cover the entire base.
- First Cream Layer: Spoon half of the mascarpone mixture over the ladyfingers. Gently spread it evenly with your spatula, ensuring it completely covers the cookie layer.
- Second Ladyfinger Layer: Add another layer of quickly dipped ladyfingers on top of the mascarpone cream.
- Final Cream Layer: Spoon the remaining mascarpone mixture over this second layer of ladyfingers, smoothing the top to create an even surface.
4. Chill and Set
Cover the dish tightly with plastic wrap. This step is non-negotiable! Refrigerate your no-bake tiramisu for at least 4 hours. However, for the best flavor development and firmest texture, refrigerating it overnight is highly recommended. The longer it chills, the more time the flavors have to marry and the ladyfingers to soften to perfection.
5. The Finishing Touch
Just before serving, remove the tiramisu from the refrigerator. Sift a generous layer of unsweetened cocoa powder evenly over the entire top surface. This creates the iconic tiramisu finish and adds a wonderful bittersweet contrast. For an extra touch of elegance and texture, sprinkle the shaved or grated dark chocolate over the cocoa powder.
Tips and Tricks for an Unforgettable No-Bake Tiramisu
While the basic steps for a no-bake tiramisu are straightforward, a few expert tips can elevate your dessert from delicious to truly unforgettable:
- Coffee Quality Matters: Don't skimp on the coffee! Use freshly brewed espresso or a very strong, dark roast coffee. If you don't have an espresso machine, a French press or Moka pot can yield excellent results. Make sure it's completely cooled to room temperature before dipping the ladyfingers.
- Mindful Dipping: The most common mistake is over-soaking the ladyfingers. They are like sponges and will absorb liquid quickly. A quick dip (1-2 seconds per side) is usually all it takes. You want them moist, not mushy.
- Alcohol Alternatives: If you prefer to avoid alcohol, simply omit the coffee liqueur. You can enhance the coffee flavor by using a tiny bit more coffee extract or a non-alcoholic coffee syrup. Alternatively, a splash of vanilla extract can be added to the coffee mixture.
- Chill Your Tools: For perfectly whipped cream, consider chilling your mixing bowl and beaters in the freezer for 10-15 minutes before whipping. Cold tools help the cream whip faster and achieve better volume.
- Taste and Adjust: Before the final layering, taste your mascarpone mixture. If you prefer it sweeter, add a little more granulated sugar, one tablespoon at a time, and mix until dissolved.
- Presentation Perfection: While a large dish is classic, individual servings in glasses or small bowls look incredibly elegant and are easier to serve. For a clean cut in a larger dish, use a sharp knife warmed under hot water and wiped clean between each slice.
- Flavor Variations: Feel free to experiment! A hint of orange zest in the mascarpone cream can add a bright, fresh note. A sprinkle of toasted nuts (like almonds or hazelnuts) on top can introduce a delightful crunch.
- Embrace the Wait: The chilling time is critical. It allows the ladyfingers to fully soften, the flavors to meld, and the cream to firm up. Rushing this step will result in a less cohesive and flavorful dessert. As mentioned in various culinary guides, including those focused on Crafting Classic No-Bake Tiramisu: Flavors Improve Overnight, patience truly rewards you with superior taste.
Conclusion
The journey to creating a spectacular no-bake tiramisu is one of delightful simplicity and rewarding indulgence. This elegant Italian classic, with its layers of coffee-soaked ladyfingers and velvety mascarpone cream, proves that you don't need an oven or hours of complicated steps to achieve a dessert that will truly impress. It's a testament to the power of quality ingredients and a few careful steps, culminating in a treat that offers a blissful escape with every spoonful.
So, whether you're celebrating a special occasion, hosting friends, or simply craving a sophisticated sweet escape, our quick and easy no-bake tiramisu is your perfect companion. Prepare it, chill it, and then simply savor the moment. Get ready to enjoy the cheers and compliments, as this Italian masterpiece is sure to become a cherished recipe in your culinary repertoire.
